
Sign participation agreement

Once the Organisation Manager has completed the initial PCA registration steps (in the Register your Healthcare Provider Organisation section), the Organisation Manager is presented with the Participating Organisation screen for the registered organisation and will also receive an email containing a unique link to the PCA Signing Page screen.

You can sign the Participation Agreement using the following methods:

1. The Organisation Manager may complete the signing process:

  • As themself, if they are an authorised officer (such as a Company Director); or
  • as an authorised delegate (this will require a statutory declaration to be inked signed); or
  • on behalf of another signatory.  This will involve generating documents on behalf of someone else.

2. Depending on the signing role selected, the signing of your participation agreement may have different signatory requirements and require different evidence of authority documents to be uploaded.

The below example is based on an organisation with a legal structure of “Company”.

Summary of steps to sign participation agreement:

  • Log in to the PCA Portal and open your Participating Organisation (PO).
  • The Participating Organisation screen is displayed along with the Setup an organisation pop up windows helper wizard. This will to guide you through signing the participation agreement and uploading authority documents. The helper wizard won’t display after you have completed the steps for your first organisation.  
  • If the Organisation Manager:
    • is generating documents for themself, or another signatory, on the Participating Organisation screen, the Organisation Manager clicks on the Sign & upload documents option within the helper wizard. The PCA Signing details screen is displayed.
    • has forwarded the email containing the unique link to another signatory, the signatory clicks on the unique link and logs into PRODA. The PCA Signing details screen is displayed.
  • On the Signing details section, select a signatory type to generate documents. Select either I will be signing a participation agreement or Someone else will sign the participation agreement if you are completing details on behalf of another signatory.
  • Select a role for the signatory
  • Depending on the signatory role type selected you will be prompted to provide additional details (e.g. Signatory job title, Signatory name)
  • Click the Save details button
  • There are two options to generate the participation agreement and statutory declaration (if required)
    • For Ink Signing option, click the Download to sign button to download the participation agreement and statutory declaration (if required) to your computer
    • For Electronic signing option, click the Electronically sign button to generate the participation agreement 
  • On the PCA Signing Page, depending on the documents you are required to upload:
    • Click on the Browse for a file button in-line with the document type, and
    • Upload the corresponding file/s.
  • Find out more about ASIC documentary evidence
  • Once all required documents have been uploaded, you will receive an "All documents have been uploaded. You can now submit for assessment." message and the status will also show the documents that have been uploaded. An email acknowledging the upload of all required documents is sent to the Organisation Manager.
  • On the PCA Signing page, the Organisation Manager clicks on the Submit for assessment button.
  • Once submitted, the Publisher status will update to: Pending Approval

Detailed steps

Step 1

Log in to PCA and retrieve your organisation. When the Participating Organisation screen is displayed, the Setup an organisation helper wizard will display.

Screen shot of PCA connect setup organisation screen

Step 2

1. Select the Sign & upload documents option.
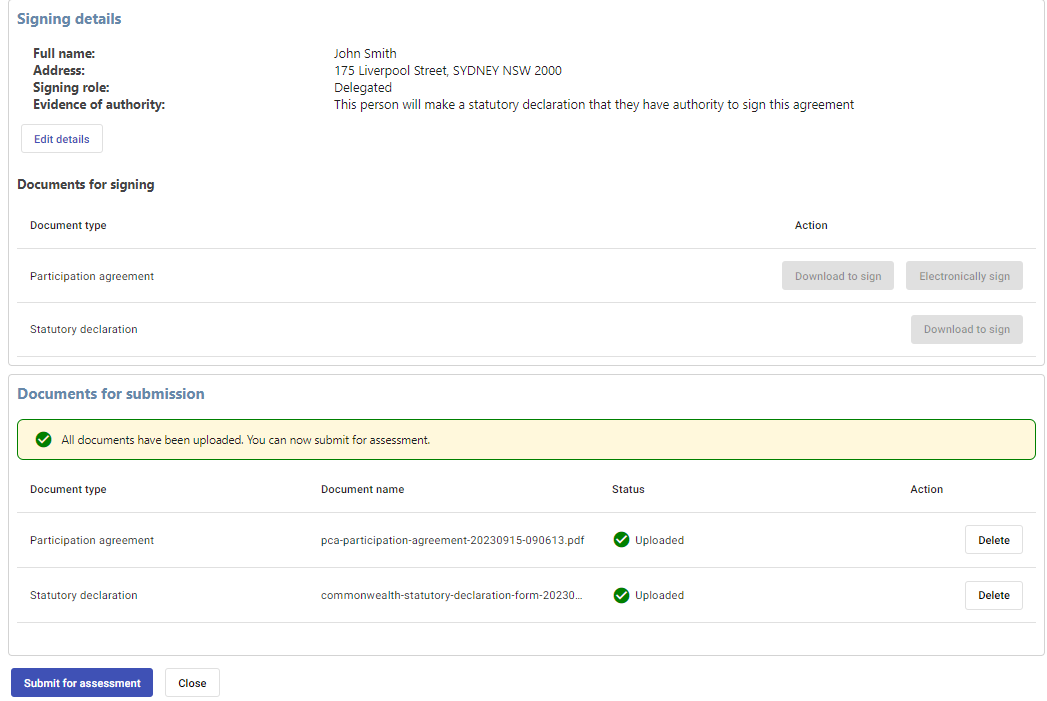
 The PCA Signing Page is displayed.

Step 3 (optional)

Share with someone else.
If another person within your organisation needs to sign the participation agreement and/or upload their evidence of authority documentation, you can forward them a link to this page:
    a. Click the Copy link button
    b. Create a new email or new messaging system message (e.g.Teams) addressed to the person or persons signing the agreement and paste the copied link into the email or message, along with some guiding instructions.
    c. Send the email/message.

Note: The link is a URL for the PCA Signing Page. The person (e.g. Director, Company Secretary, Trustee, Partner) that is sent the link can click on the link and sign into  PCA via PRODA and then be directed straight to the PCA Signing Page. This person can then sign and upload a participation agreement.

Screen shot PCA signing details


NOTE: There are different ways the participation agreement may be signed.  The following three scenarios detailed in Step 4 illustrate each approach. Proceed to Step 5 after selecting your preferred signing option.

Step 4a

If you are signing the agreement with Delegated Authority, on the PCA Signing Page, in the Signing details section:
    a. Select the I will be signing a participation agreement option
    b. In the Signing roles field, select Delegated Authority.

Note: Select Delegated Authority if you are not an authorised officer of the organisation (e.g. a Director) but you have delegated authority to sign the agreement.  For example, you may be a Practice Manager or a Business Manager. 

    c. Provide your Job Title at the organisation 
    d. Provide your Full home address
    e. Click the Save details button.

Next: proceed to step 5.

Screen shot PCA signing details


Step 4b

If you are signing the agreement with an authorised officer signing role (e.g. Director, Trustee), on the PCA Signing Page, in Signing details section:

    a. Select the I will be signing a participation agreement option
    b. Select your Signing role (e.g. Director) in the signing roles field
    c. Select your preferred Evidence of Authority option
    d. Where you have selected This organisation will upload evidence that this person has authority to enter into an agreement: 
    e. Click the Save details button.

Screen shot PCA signing details


f. Where you have selected This person will make a statutory declaration that they have authority to sign this agreement:

  • Provide your Full address
  • Click the Save details button.
Screen shot PCA signing details


Next: proceed to step 5.

Step 4c 

If you are generating the agreement for someone else to sign, in Signing details section:
    a. Select the Someone else will sign the participation agreement option
    b. Select their signing role (e.g. Director) in the Signing roles field
    c. Select your preferred Evidence of Authority option
    d. Where you have selected This organisation will upload evidence that this person has authority to enter into an agreement
    e. Provide their Full name
    f.  Click the Save details button.

Screen shot PCA signing details


    g. Where you have selected This person will make a statutory declaration that they have authority to sign this agreement:

  • Provide their Full name
  • Provide their Full address
  • Click the Save details button.
Screen shot PCA signing details


Step 5

Once details for the participation agreement (and if applicable, the Statutory Declaration) have been saved:

A. For ink signing option:

On the Documents for signing section, click the Download to sign button to download Participation Agreement and a Statutory Declaration (if applicable).

Note: the screenshot is an example of a user for an organisation with a legal structure of ‘Company’ and Delegated Authority was selected as the signatory role.

Screen shot PCA signing details


  • Check your internet browser for the downloaded document/s
  • Print the documents
  • Fill and sign the documents, scan and save them to PDF format in order to be uploaded.
PDF downloads - screenshot


Note: An example of a correctly completed Statutory Declaration can be seen at the bottom of this page.

On the PCA Signing page section, depending on the documents you are required to upload:

  • Click on the Browse for a file button for each document type, and
  • Upload the corresponding PDF file/s.
Screen shot PCA signing details


Note: The Statutory Declarations row is only displayed where Delegated Authority signing role was chosen OR the This person will make a statutory declaration that they have authority to sign this agreement evidence option was selected.  

B. For electronic signing option (for Participation agreement only):

a. On the Documents for signing section, click the Electronically sign button

Note: the screenshot is an example of a user for a partnership legal structure and Partner was selected as the signatory role.

Screen shot PCA signing details


b. On the Sign participation agreement window, click on Copy password button, paste the  password into the Enter password field, and then click the Continue button.

Screen shot PCA signing details


c. Click on Next required button or scroll down to last page where signature is required

Screen shot PCA signing details


d. Click on the Click here to sign field

Screen shot PCA signing details


e. You will be presented with four options on how to sign the participation agreement. The most common and easiest option will be to type in your signature

Screen shot PCA signing details


f. Type in your signature then click on Apply

Screen shot PCA signing details


g. Click on the Click to sign button to complete the electronic signing.

Screen shot PCA signing details


NOTE: There is also an option to download a copy of the participation agreement that you just signed.

Screen shot PCA signing details


   h. On the PCA Signing page section, depending on the documents you are required to upload:

  • Click on the Browse for file button for each document type, and
  • Upload the corresponding PDF file/s.
Screen shot PCA signing details


Step 6

Once all mandatory documents have been uploaded (according to options selected), the Organisation Manager who registered the organisation will receive an All documents have been uploaded. You can now submit for assessment message.  

If other users (and not the Organisation Manager have uploaded all mandatory documents), an email acknowledging the upload of all required documents is also sent to the Organisation Manager.  A link is provided in this email which will launch the PCA signing page so the Submit for assessment button can be initiated. 

ASIC documentary evidence

  • When you are asked to upload an ASIC Company Search, you can upload any type of ASIC generated document
  • This includes a company search (if you have one) or an ASIC extract, ASIC annual company statement (no older than 2 years) that contains key information such as :
    • the ABN you're registering in PCA
    • Company/Legal Name associated with the ABN
    • Each Officer bearers full name and role (e.g. Director, Company Secretary). 
  • The Australian Digital Health Agency will need to confirm this information in ASIC-generated documents when assessing your uploaded documents against the organisation you register in PCA.

Note:  Not all listed upload options are mandatory.  Where the Delegated Authority role or Statutory Declaration option were selected previously, all other listed evidence options are not mandatory to upload a document.

Screen shot PCA signing details


Step 7

Click the Submit for assessment button

Screen shot PCA signing details


Your request has been submitted for assessment. The person who registered your organisation will receive email acknowledgment of the submission.

The Australian Digital Health Agency will assess your request. This can take up to 24 hours.

Once approved, the person who registered your organisation will receive email confirmation of approval. The email will have further instructions to set up your organisation.

When you receive the approval email, you can continue to the next section: 

Set up your organisation

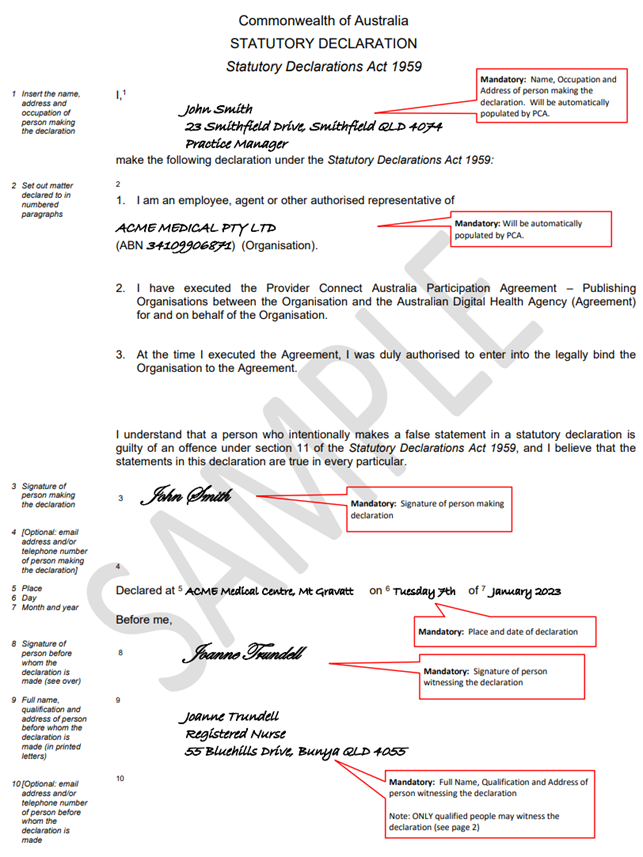
Example of completed statutory declaration

Chat